 |
| How to Disable Automatic Updates in Windows 10 |
Are you upset due to background updates of your Windows 10?
Yes, it is quite irritating that updates are downloaded in background. Since it eat up the large data volume of your limited data plan. Also it might cause some technical issues with the computer system too. It also reduces internet speed during browsing internet.
Windows release updates to make software more secure, and powerful than previous version. In Windows 10, Microsoft has made it by-default compulsory to keep their computer updated. Also Windows 10 don not have such option to disable updates from downloading.
Windows 10 users are not able to disable these Windows 10 updates. Users can only set time during which they can schedule their updates to be downloaded and install.
Updates schedule option is available for Windows 10 Pro users only. Windows 10 Home users, won’t see any option to schedule the updates.
So, in this post I am gonna share some tricks using which you can disable windows 10 operating system updates and hence save your data.
1. Set WiFi as Metered Connection
Contents
show
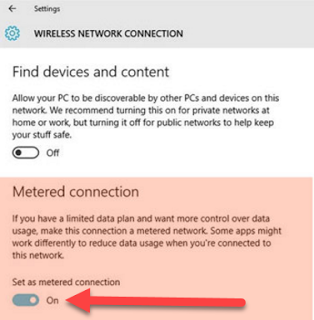
Firstly, if you are using WiFi to access internet in your Windows 10 computer/laptop, then you can disable the automatic updates by enabling Metered Connection option.
Step 1: Search for Change WiFi settings in Start Menu or Cortana. Now Click on WiFi option.
Step 2: Now click on your WiFi name and click on Properties. After that turn on the Set as Metered Connection.
Now this option will stops your Windows 10 computer/laptop from downloading automatic updates. This is very easy method. If you use Ethernet then you can follow second method instead of first. Since it works only if you are using WiFi Connection.
2. Disable Automatic Updates Using GP Editor
Since the option to disable the automatic updates is hidden from the settings of Windows 10 Operating system. But by using GP Editor (Group Policy Editor), you can easily make this option show up in the System & Security settings of your Windows 10 computer. Thus it prevent from downloading the Windows 10 automatic updates.
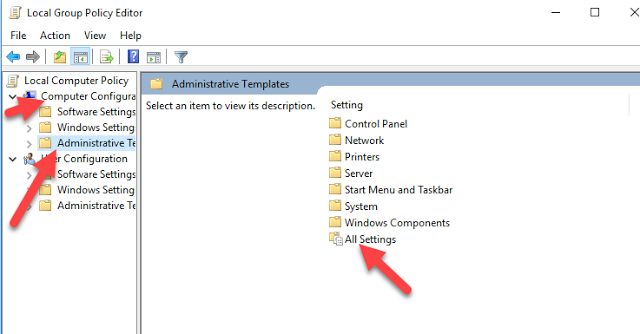
Step 1: Open Group Policy Editor by searching gpedit.msc in the search bar or corona and press Enter.
Step 2: Now GP Editor opens, click on Computer Configuration, and select Administrative Templates as shown below. After that double Click on All Settings.
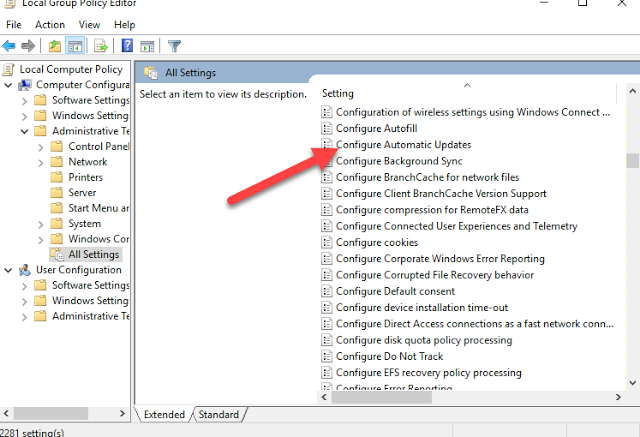
Step 3: Now, a list opens. Scroll down the list to find the option Configure Automatic Updates. Double click on it as shown below.
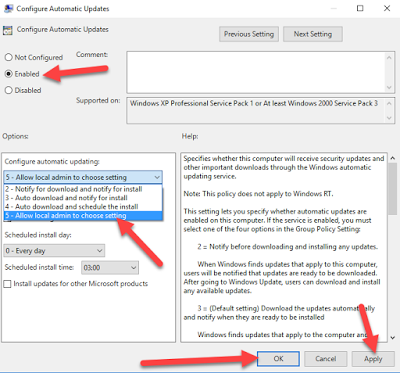
Step 4: Next you have to select the Enabled radio button from the upper left side of the window as shown below. After enabling the automatic updates, you should see the drop down options at the bottom. Click on the dropdown bar and choose the fifth option Allow local admin to choose setting.
Step 5: Now click on Apply and Ok button to save the setting.
After doing all these setting, the option to disable the automatic updates will be visible in your Windows 10 settings.
Just search for Windows Update settings in the search bar or cortana. It will then show you an option that says Check for updates but let me choose whether to download and install them. Select this option and after this your computer will never download and install updates automatically without your permission.
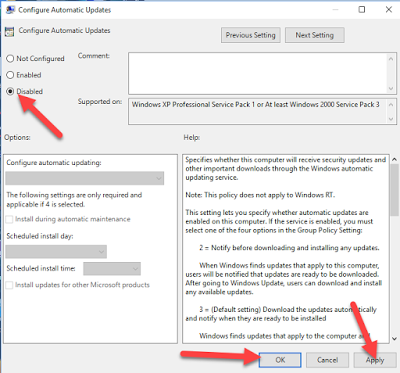
Note: If you completely block Windows 10 updates from downloading without even your permissions then you can select disable option as shown below in step 4. Press Apply and Ok button.
Now your Windows 10 updates is completely turn off using this method.
So in this post I have discussed two methods to disable Automatic Updates in Windows 10. I hope this method will help you in disabling updates. If you like this post then don’t forget to share with your friends on social media.

Really useful post bro. Thanks for sharing. Once my window 8 PC stuck due to update. And do you know it took 3 hours to reeboot.